
Replacing A Treadmill Belt: When, How & Cost
Jul 04, 2025
 1
1
 Replacing A Treadmill Belt: When, How & Cost www.runnerclick.com
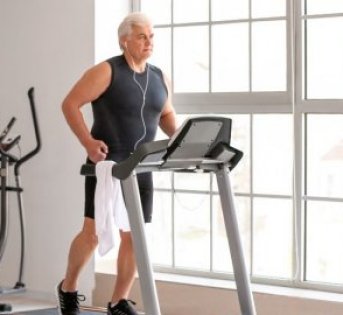
 If your treadmill doesn’t seem to be running as smoothly as the day you purchased it, it might be time for a walking belt replacement. While most of the best treadmills are built to last for decades, the belts are only equipped to handle 5-10 years of continued use.
Belts are slightly pricey, and installation may take up to an hour, but it’s an investment worth making to keep your beloved treadmill running in tip-top condition!
Test your belt first before you chuck your old treadmill to the curb. Replacing an old belt is much easier and budget-friendly than buying a new treadmill!
Below, I’ll explore ways to test your treadmill belt and provide a step-by-step guide on how you can replace it yourself.
How to tell if your treadmill belt needs replaced?
- Shuffle Test. While the treadmill is off, shuffle your feet back and forth on the belt like you’re rocking on a surfboard. A good belt should glide smoothly. If you notice any sticking points, or if the belt jerks and doesn’t glide smoothly, it may be time for a replacement.
- Walking Test. Again, make sure that the treadmill is off and push against the dashboard of your machine. A good drive belt will allow you to walk freely. If your belt needs replaced, it will be pretty tricky to get the belt rolling.
- Feel Under The Belt. This is an excellent way if there is too much friction on the underside of the belt. Lift the belt slightly and run your hand along the bottom of the belt. Check where your feet typically land when starting your machine because this is the part of the belt that experiences the most wear and tear. If the bottom of the belt is jagged and bumpy, it’s time for a replacement!
- Gauge Your Belts Age. If you bought your machine second-hand, this is a little difficult to determine. Most 1-ply treadmill belts will last up to five years for the average user, and a 2-ply belt should be good for around ten years.
How to replace a treadmill belt: step by step DIY guide
On average, a new treadmill running belt or treadmill walking belt costs 100-200 bucks. To have the pros come in to install it for you will cost you an extra 200 bucks.
If you want to save yourself 200 dollars (around the same price as a great pair of running shoes!), replacing the belt yourself is relatively easy if you follow these steps.
Tools Needed:
- Replacement Belt
- Allen Wrench
- Screwdriver
- Wrench Set
- Treadmill Belt Lubricant
Step 1.
Unplug the treadmill from the power source and remove the safety key.
Step 2.
Using a screwdriver, remove the motor hood on the front of the treadmill and the rails along the left and right side of the belt.
Step 3.
Lift the belt into the locked upright position (if it’s a folding model) and loosen the tension rear rollers along the back of the belt.
Once loosened, you should be able to glide your hand under the belt effortlessly.
Step 4.
Lower the deck and loosen the front rollers using your screwdriver, and lift the rollers from their locked position.
The belt is now ready to be removed!
Step 5.
Slide the old belt off the track, wipe down the deck with a cloth, and replace it with the new belt.
Step 6.
Replace all of the loosened and removed adjustment bolts and screws.
Don’t tighten the tension screws at the back of the deck; you need those loose to test the new belt.
Step 7.
Now it’s time to test your new treadmill belt. Plug your machine back into the wall, and run the device at the lowest speed – but don’t step onto the deck just yet!
Run the belt for a few minutes to ensure that the belt is tracking right down the middle.
If it isn’t, loosen the adjustment screws along the back and center your belt until it runs right down the middle.
Step 8.
Using your lubricant, evenly apply a layer of lubricant to the deck.
Spread the oil along the deck using a paint stirrer to ensure even distribution.
Step 9.
Plug your machine into the power source, place the new walking belt at a low speed, and slowly walk on the belt to evenly distribute the lubricant.
Step 10.
Lace up those running shoes and go for a run!
Conclusion
Treadmills often wind up at yard sales for one of two reasons: they have become a glorified coat rack, or users don’t realize that a sluggish machine is due to an old belt.
Ensuring that you replace the treadmill motor belt when needed keeps your machine running like new and can also extend the life of your device. Many treadmills break down to the point of no return simply because users don’t replace their belts.
Proper maintenance and treadmill repair is key to prolonging the life of your home gym/fitness equipment. Ensure that you always keep the belt lubricated (most experts suggest lubricating it every three months) and replace it if it doesn’t pass the belt tests listed above.
Belts are slightly pricey, and installation may take up to an hour, but it’s an investment worth making to keep your beloved treadmill running in tip-top condition!
Latest Articles
 Is Running on a Treadmill Easier Than Running Outside?Runners have their own preferences, whether it is treadmill running, running outside on the road, or exploring trails. So...
 Is It OK to Use Trail Running Shoes on the Road?While trail running shoes can be used on roads, especially in situations where a runner encounters mixed terrains or pref...
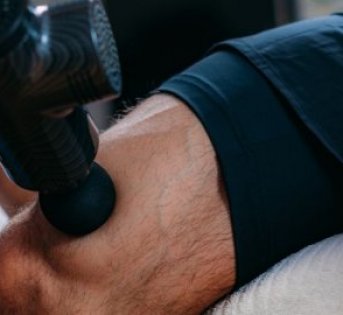 How to Fix Sore Quads After Running?Rest, ice, gentle stretching, and over-the-counter pain relievers can help soothe sore quads after running. Also, ensure ...
 10 Fruits With The Most Electrolytes to Replace Sports DrinksThese fruits are high in electrolytes such as potassium, magnesium, and calcium, essential for hydration, muscle function...